Tuesday, November 29, 2016

Showcase: Forgeworld's Carmine Dragon

Greetings!

I painted something!!!

It's been too long, dear readers, but I finally have some new content for you to feast your eyes on. 

This week (as in, it took two days start to finish, because I'm in the process of moving and needed to get it DONE), I painted up Forgeworld's Carmine Dragon as a commission piece. 


Rawr.

He wanted it to go with his Wood Elves army, mainly as a Green or Forest Dragon scheme, so that is what I strove to achieve. He wanted a more whiteish highlight on greens, so I took to Sybarite Green and Gauss Blaster Green to make that happen.


I otherwise stuck to some classic techniques that I personally enjoy using, especially for the horns and teeth, while trying out a couple other new ones.


Don't touch my egg.

I had fun with it for sure, as I'd never painted a dragon before, especially a big one like this. 


Spikes for daaaaaays.


Oh hai, I see you.

From above.

From slightly more above.

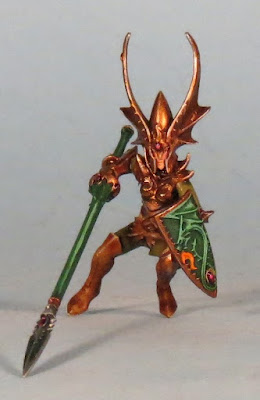
Since it was to be an epic dragon though, he wanted it to have a rider. And here he is!

I don't always take good pictures.
You can't see it, but I did even pick out the eyes, because I'm that kind of nutter. So, with a pointer on where to stick him, I glued him on at the end and this is how it turned out:


You wish you could dragon surf like this guy.
Elves care not for physics. 

Sweet elvish bootay.

  
He's stabbing this caption.


"Hi-ho, Silv-I mean Green, away!"
So that's the final product! The client absolutely loved it, so I'd call that a success for a couple days of painting!

Here are my stages for painting over a black primer, for anyone curious enough to give it a go:

Dragon
Scales layers:
- Caliban Green base
- Warpstone Green layer 1 (overbrush)
- Sybarite Green layer 2 (drybrush)
- Gauss Flayer Green layer 3 (drybrush)
- Waywatcher Green (wash)
- Sybarite Green layer 4 (drybrush)
- Gauss Blaster Green layer 5 (drybrush)
- 1:1 Gauss Blaster Green : White Scar White layer 6 (drybrush)


Belly layers:
- Caliban Green base
- Loren Forest layer 1 (overbrush)
- Straken Green layer 2 (drybrush)
- Nurgling Green layer 3 (drybrush)
- Ushabti Bone layer 4 (drybrush)
- Screaming Skull layer 5 (drybrush)
- Waywatcher Green (wash)

Bone layers:
- Rhinox Hide base
- Bestial Brown layer 1 (layered)
- Snakebite Leather layer 2 (layered, slightly lined)
- Bubonic Brown layer 3 (layered, lined)
- Ushabti Bone layer 4 (layered, more clear lined)
- White Scars White layer 5 (layered, distinct lined)

Mouth/Gemstone layers:
- Khorne Red base
- Emperor's Children layer 1 (drybrushed/spotted)
- Thinned Purple Ink wash
- Emperor's Children layer 2 (same as ^)
- White Scars White layer 3 (spot highlight)
- 'Ard Coat gloss

Eyes:
- Yriel Yellow base
- Red Ink glaze
- Yriel Yellow touch up
- Black (pupil)

Elf
Gold Armor:
- Balthasar Gold base
- Reikland Fleshshade wash
- Gehenna's Gold layer 1 (layered/drybrushed, depending on location)
- Mithril Silver layer 2 (same as ^)

Skin:
- Dwarf Flesh base
- Reikland Fleshshade wash
- Dwarf Flesh layer 1 (layered)
- Elf Flesh layer 2 (layered)

Eyes:
- Pallid Wych Flesh base
- Black (pupil)

Boots/Belt/Packs:
- Zandri Dust base
- Seraphim Sepia wash 1
- Reikland Fleshshade wash 2
- Ushabti Bone layer 1 (layered)

Green Cloth:
- Straken Green base
- Athonian Camoshade wash

Speartip:
- Boltgun Metal base
- Coelia Greenshade wash
- Mithril Silver highlight

Base
Tree:
- Raw Umber base
- Celestra Grey layer 1 (drybrush)
- Ushabti Bone layer 2 (drybrush, inner rings)

Moss:
- Castellan Green base
- Nurgling Green layer 1 (drybrush)

Ground:
- Rhinox Hide base
- Mournfang Brown layer 1 (overbrush)

Rocks (as per Ground, then):
- Celestra Grey layer 2 (overbrush)
- Longbeard Grey layer 3 (drybrush)


Thanks for reading, I'll see you again soon enough!

Saturday, July 16, 2016

Battle Report: Battlefleet Gothic on Vassal, "Raid on Kittery-804"

Greetings!

Time for another battle report! In the ongoing campaign for the Armus sub-sector, the Chaos fleet led by the Lord Kol Sarat takes on the Imperials once more, this time in a punitive raid on Kittery-804. Not participating in the raid himself, he sent the Warmonger, Agony, and Hellblade to reconnoiter in force. Patrolling the far flung penal colony system at that time fell to the Brazen, Valiant, and 711th Squadron.

Cruiser Clash

Chaos (subplot - Enemy Plans)
Hades Class Heavy Cruiser Warmonger
Slaughter Class Cruiser Agony
Slaughter Class Cruiser Hellblade

Imperial Navy (subplot - Experimental Ship)
Lunar Class Cruiser Valiant
Gothic Class Cruiser Brazen (+2 HP, -1 Ld)
5 Firestorm Class Frigates 711th Squadron


Turn 1: Chaos


The Agony's captain, fresh from repairs within the warp and eager to spill blood, ordered his squadron to close as fast as possible with the enemy. With gusto and blazing engines they shot ahead 57(!) cm (the roll was 6, 6, 6, 6, 3). The Warmonger followed along leisurely behind, coming into extreme range with its heavy lance armament. At long range the gunners showed their metal, scoring three hits on the Brazen. This is where I found out the ship actually had 10HP to start the game with, hoi!

Turn 1: Imperial Navy 


Holding their discipline in the face of the insane bravado of the Slaughter squadron, the Imperials took advantage of the close range to unleash their particular brand of hell on their enemy. Linking their fire, the 711th and cruisers bracketed the Agony, stripping shields, sundering the hull, and damaging the thrusters, resulting in several hull breaches. Torpedoes screamed into the Hellblade, and while the turrets took out an average number, they still scored a hit. A telling turn of events, and the Agony's captain was cowed...

Turn 2: Chaos


Bleeding heavily into space, the Agony attempted, and failed, to disengage. The Hellblade turned into the enemy's rear and peppered a weak broadside into the Brazen's aft quarter, taking down the shields and scoring a hit. The Warmonger locked on, bringing all guns to bear (as I'm writing this, I just realized I didn't reroll my misses due to lock on, gosh darn it!) on the Firestorms and the cruisers. Still, the weapons batteries scored three hits and the lances two, resulting in two destroyed frigates. The prow lances missed the Brazen, and since I forgot my orders, I passed the turn...

Turn 2: Imperial Navy


The remainder of the 711th squadron swung around to light up the Agony, while the cruisers were poised to make use of both broadsides. The Agony's captain suffered the final humiliation for his hubris, and his ship was rendered combat ineffective. It proceeded to drift out of the engagement area, and his fellow captains saw fit to not retrieve his hulk. Despite the weight of fire, only shields sustained hits during this turn, though the Hellblade was also crippled. The Emperor's light seemed to be shining on the Imperials now!

Turn 3: Chaos


While the Hellblade came about for another gunnery run, the Warmonger closed in on the Brazen for an exciting boarding action! The result was a crushing victory for Chaos (he rolled a 1, I rolled a 6), and it took a huge amount of damage! I also succeeded in uncovering the enemy's battle plans during the action (I was after his lucky charms!), completing my subplot.

Turn 3: Imperial Navy


Well, the 711th disengaged at high warp, while the cruisers unfortunately remained, due to low leadership values.

Turn 4: Chaos


The Warmonger continued her persecution of the Brazen, targeting her with available guns and hulking the ship, while the Valiant finally escaped. A fine prize indeed...


What a back and forth game! First he smashed me, then vice versa. I thought I was in trouble, early on. The Slaughters definitely overshot where I wanted them to go; they were supposed to be the ones to board an enemy ship, but they definitely got too close, then wreckfaced because I was thinking "I only need one to do what I need to...right?" Poor choice, as his Firestorms went bananas and scored a bucket ton of hits all at once. Oh well, live and learn right? The boarding action swung the game back in my favor, no questions there; a 1 to a 6 is always going to hurt. Just wasn't expecting it, though I can't complain about the result.

Would you have played it any different? Spot anything we missed? Let me know in the comments section!

Saturday, July 9, 2016

Battle Report: Battlefleet Gothic on Vassal

Greetings!

Today I will be discussing a battle I played over Vassal, with my good man Ruckdog as the punching bag du jour.

I first met Ruckdog (one of the many Andrew's in attendance) at Adepticon during the BFG tournament, an event I strive to play every year because it's quite possibly my favorite game of all time. He's a pretty cool guy, and invited me to check out his forums called Man Battlestations, a site all about warship gaming. Pretty cool stuff!

Anyway, he's been running a BFG campaign, and while it has been a slow start, we've gotten the ball rolling and I actually recorded one of our games! Introducing the fleets:

Imperial Navy (Ruckdog's)
Exorcist Class Grand Cruiser Guardian
Dominator Class Cruiser Audacious
Lunar Class Cruiser Valiant
Lunar Class Cruiser Bellerophon
6 Sword Class Frigates 302nd Escort Squadron

Chaos (Me!)
Styx Class Heavy Cruiser Hateful Death
Devastation Class Cruiser Bearer of the Word
Devastation Class Cruiser Hellbringer
Slaughter Class Cruiser Torture
Slaughter Class Cruiser Hellblade

We played a Fleet Engagement, Deployment B. Here's how we deployed:


A few scattered gas clouds and a chunky asteroid field gave us some terrain to play around. I lost the roll for first turn, so it was on to him!

Turn 1: Imperial Navy


It was the start of the engagement, and already the Chaos fleet was approaching the rear quarter of the Imperials! Determined not to let that come to pass, the 302nd passed Come to New Heading and swiftly came about. The rest of the fleet kept to minimum speed, turning slowly to face. The first shot of the game was a snap shot Nova Cannon shell from the Audacious, which missed as such a long range.

Turn 1: Chaos


The Tyrant Kol Sarat (my fleet commander) ordered the squadron of Slaughters to swing about quickly, and they easily passed their Come to New Heading check (Ld 10 due to subplot, wooo!). All of the carriers dumped a lot of assault boats and bombers into the void, and that was pretty much my turn.

Here's what the board looked like at the end of turn 1:


Some more maneuvering will be in order!

Turn 2: Imperial Navy


You'll have to ignore those zigzaggy lines; at this point we had a connection issue, resulting in doubling and trebling ships and dice and everything else; needless to say we had some fixing to do. But once we did, it was on to the battle again! The cruisers completed their turns, rang out with another Nova Cannon shot (that missed again, seriously this is the most amount of shots I've let him had in a game and they're getting flummoxed with the generosity =P ). Two fighters took down two assault boats.

Turn 2: Chaos


Those red tokens were simply marking copy ships that he could see (but not me), so just ignore those...

The carrier squadron rearmed and refueled their squadrons, ready to send them into the void again later. In the meantime the Slaughter squadron went All Ahead Full and rolled a mighty 10 on five dice...le sigh. Still, 40cm is nothing to scoff at! The assault boats swept into the Audacious, causing a few swiftly repaired critical hits, while the bombers waited for the other cruisers to run them over.

Turn 3: Imperial Navy


The Imperials closed ranks, attempting to use their armored prows as a shield and their hulls as a knife to cut apart the Chaos fleet. The downside is that their firepower could not be brought to bear just yet. A nearly point blank Nova Cannon shot misses yet again!

Turn 3: Chaos


The leader of the Slaughter squadron grinned ferociously as he counted down the range. The Audacious would be at the extreme edge of his effective range, but that still meant it could be done...they Locked On. The carriers put up a small fighter screen to protect mainly against torpedoes, while also putting assault boats and bombers back into space.

Combined, the Slaughters put out an impressive FP28 and 4 lances; needless to say, the Audacious was rocked on its keel and suffered heavily.

Turn 4: Imperial Navy

(neglected to take a picture)

The crippled Audacious disengaged, and the rest of the squadron closed to torpedo range. The 302nd unleashed a fusillade into the Torture, scoring a few hits. More importantly, my turrets were wholly ineffective, resulting in multiple torpedo strikes on both the Torture and Hellblade. The Torture was crippled and the Hellblade's bridge was smashed away, leaving the second in command in charge. The Chaos bombers were swept away, but the assault boats completed their attack run and caused some critical hits to the Bellerophon. These were swiftly repaired.

Turn 4: Chaos


The captain of the Torture, no longer sporting a toothy grin, ordered his ship to disengage, vowing revenge on the cowards who struck from afar. The rest of the fleet continued about, with just a few lance shots streaking through the void to strike the Bellerophon, causing minor damage. Seeing the futility of bomber runs, the carriers simply launched all assault boats, hoping to silence the enemy guns through hit and run attacks than by outright destroying them.

Turn 5: Imperial


Seeing a lone ship vs a squadron of ships, the Imperials turned to pounce on the Hellblade. Luckily it was up to the task and shrugged off the shots that came its way. In a serious of miscommunications, the Lunar squadron did not reload their torpedoes; this would prove to be most unfortunate. Still, they fired their broadsides at the Hellbringer, scoring a couple hits.

Turn 5: Chaos


Seeing the perfect lineup unfolding before his eyes, Kol Sarat ordered all ships to turn to starboard and set their guns; they'd all be "crossing the T" now, and it's time to be effective! Without Lock On orders though, all I managed to do is bang a few shields. More importantly, he succeeded at Brace for Impact! with both squadrons, severely limiting their effectiveness next turn. At such close range, the assault boats from the carriers were launching and returning immediately, many swift sorties one after another. The Bellerophon was targeted heavily, resulting in all the guns being taken out (2-4 times with some of them!) and multiple engine damages. With the sustained casualties, repairs were not so forthcoming.

Turn 6: Imperial Navy


Reluctantly the Bellerophon disengaged, leaving the Valiant to cause more damage to the enemy. In a repeat of the previous turn, the patter of light return fire was swept aside by the void shields of the Chaos ships.

Turn 6: Chaos


Crossing the T once more, the carriers put some heavy duty broadsides into the poor Valiant, and combined with the assault boats brought it down quite a bit in hit points. Poorly maneuvered (they are without a bridge, after all), the Hellblade only scored a single frigate to its name.

After this, the Imperial Navy disengaged as a whole, leaving the Delphi system to the clutches of Kol Sarat! (243 VP to 42 VP, Chaos favor)


I think in this game we both deployed correctly. He has been subject to my use of squadroned firepower the last couple games, so he wanted to give it a try himself. I think if he had kept the Audacious by itself, it could have made better use of the Nova Cannon, allowing the Lunars to range ahead and distract, though they'd be lacking the heavy broadsides of the Dominator. I think the only maneuvering foibles would have been the too-early turns later in the game, allowing me to cross the T multiple times and rake him across the prow. Perhaps venturing further forward to get into my rear would have worked better, because my superior speed got the better of his turns.

Either way, another fun game! I was nervous every time he said "firing the Nova Cannon" and I chose not to BFI. Any one of those times it could have scored a nasty hit, but the dice were not behaving last night. On to the next!

Wednesday, July 6, 2016

Bang, Zoom, Straight to the Moon!

Dang, just a single article in June? Someone slap me, I'm slacking.


Greetings!

I vow to keep up one article per week, because right now I'm doing a terrible job at upkeeping this blog. And it's my only one! My excuse is that June was a crazy month, what with weddings and events and blah blah blah.

So here I am back with something new to feast your eyes on: the moon! Not just any moon, but the Strawberry Moon featured last month during June, where it was all big and close and fabulous. Not much more to say I guess, but feast your eyes on a surface that is very, very far away.


Definitely got some spectacular shots of the moon. I always love photographing it...makes me want to play Battlefleet Gothic! Heh.


This is the best shot I can get of Mars. Naturally, being the next planet in the solar lineup it's really fething far away, but hey, if I can get a shot I'll take it!


Finally, this is a short video of the moon on full zoom for my camera, just watching it move across the sky. I found it interesting how shaky the image is, despite being on a tripod with nothing moving nearby. I assume it must be a bit of atmospheric disturbance, or maybe there are some minor earthquakes happening, who knows.

That's all for now, see you next time!

Wednesday, June 8, 2016

Modeling Workshop: Treads, mud, and weathering

Greetings!

This morning I have for you a short selection of pictures I took while adventuring. They are of construction equipment playing in the mud, so hopefully will be a useful reference in muddying up your tanks, construction equipment, or what have you.


Muddy muddy tracks! This shows it might be quite useful to simply use something like Stirland Mud on your tracks. Remember two things though: You still want it with very fine grit, due to the scale, because otherwise it'll look way too bloppy. Also, the mud on the tracks is darker than the mud you see on the chassis there, since it's newer and churned up and is still retaining some moisture, while the caked on stuff is completely dried out and light.

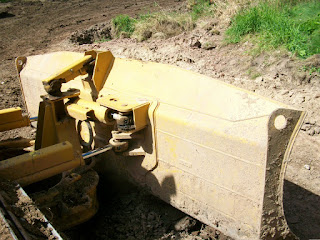
Let's move on to the dozer blade.


Their is bare metal, because obviously painting it would be a waste of money when it's going to be constantly dinged up and scratched. Here we see the two colors of mud again: dark and smeared on the lower two thirds, and dry and caked on the upper third.

It's interesting, because normally you see weathering articles showing mud on a dozer blade being stippled on more than being brushed on, but here we see there is quite a bit of smearing! I think this can be easily replicated by taking a ratty old brush where the bristles have spread a bit, wiping off a good chunk of the paint (but not as much as you would for drybrushing) and then doing a quick, streaky stroke (again and again). Easy!


Here is the back of the blade, showing how mud splatters up and dries on the rear. Overall, the machine is quite muddy and dirty, but wait! What do we spy down there?


Oooo, so shiny. This is one of the pistons that positions the blade, which means it must be well-oiled to keep it moving easily. This keeps it incredibly clean and chrome-like in the face of all that dirt, mud, and rust. A nice shiny steel paint will work well enough.


Hopefully these pictures provide a good reference, and maybe inspire a few tricks to make your models stand out something extra. Til next time!

Friday, May 27, 2016

Conversion Corner: Knight Titan LED (no putty, soldering, or programming!)

Greetings! I am finally getting around to presenting how I installed LEDs into my Renegade Knight model. It's been promised for a while, so hopefully this turns out to be something useful for you, dear readers.

All materials I used came from poweredplay.net. I came across this retailer a couple years ago at Adepticon and thought he had a pretty sweet set up. I was sold on the fact that none of these items required soldering or doing fiddly work; it is literally plug'n'play, and that suits me just fine. My dad gave me the effects board as a gift, and it got me started on the path to LEDs.


I knew I needed something awesome to put it in, and I finally decided on a Knight Titan model as the place! I also acquired some extra lights and a mini 9V battery they sell. Overall the price is decent, and when an order was messed up, he readily sent me the right lights free of charge. As well, if any connections break down, such as one of mine did, he will replace the parts for free as well. Great guy!

A quick note though, the website is a bit rough around the edges still as he gets off his feet. The product descriptions aren't full; each set of lights you buy comes with a basic board and light switch, making so all you need to light it up is a battery connector and battery. These are supplied with every effects board you purchase.


Because the effects board only slots three light strings, and I wanted at least four or more, I would need a second battery. I planned on a regular 9V battery and then went ahead and purchased PoweredPlay's mini 9V, since it has a connector already attached. Here is the size comparison between them:


Quite a difference! Still, I made sure that it all fits in the Knight Titan's torso, and it all works well enough. I used 3mm LEDs for all parts except the thermal cannon, in which I used 5mm LEDs because they fit much better. More on that later in the article.

So, on to the converting! Starting with the head, I drilled out each of the eyes with a regular drill, making sure not to carved out the edges. I then held all the bits together and used a little yellow paint down the eye holes to show me what I'd need to remove from the rest of the head to show all the light. As you can see, quite a bit has been carved out! All it takes is patience, a knife, and cutters to expedite the process.


The front needed the widest opening for the bulbs...


While the rear needed to be wider than taller to accommodate the wires themselves.

Once I felt I had it mostly ready, I did some test fits with the lights. Conveniently, one side of the lip for each light was flat, so I worked to make those two edges come together in the head, while the full lip faced outward from the middle. This required more knife work, specifically about in the middle to accommodate said lip. I used a regular exacto blade that had a few millimeters of the tip broken off sometime in the past, giving me a flat tip with which to set against the edge of where I was scraping
up.

Note too, that the piece that normally attaches through the top of the head will have to be altered to fit the lights as well; as this is a simple snip, there's not much to be said about that, other than do it.

Here is how the light looks inside the head:


And now both together, showing them relatively even leveled.


Finally, how it all looks together and lit up.


I declined putting anything over the eyes, such as using window glue to make clear openings. Despite the fact that it'd be clear to a point, I didn't want to diminish the output of the light at all, deciding that a bright glow is preferable to a diffuse one. I did not glue them in, instead relying on the tension of the head parts being glued together, and it works quite nicely.

That complete, I then matched the opening on the panel behind it leading into the torso so that the wires would stay hidden.


In the end in made that opening a little wider too so as to allow the plug through should it ever need replacing.

Moving on to the torso, I opened holes in the arm slots and the engine stacks so that wires and lights would be able to fit through/in:


I then took the engine stacks and, like with the head, held them to the body and determined where to remove plastic that would best allow for light to come through. Here is my result:


I also drilled out each little hole in the shroud, because I'm a nutter like that. The key here is to remove enough plastic so that light is coming from the base, but not filling up the entire stack, as I think that looks ridiculous. Also, you definitely need to be careful around the edges, as you could easily make my mistake and carve a little too much, requiring some repair work once it's glued to the torso. This is what I was looking to do:


What you see here is not the bulbs themselves, but the light reflecting on the bare plastic in the tube and working it's way up. It's subtle, but rather pretty, and when set to a "flicker" with the effects board, looks like internal engine fire light.

After drilling and carving was complete, I test fitted the lights, just like with the head, and made any adjustments as needed. The lights themselves sit right at the opening, with the lip of the bulb flush with the inside edge of the torso. With all the wires and batteries inside the torso as well, I was able to place them all where I needed them and the tension/pressure of wires and space keeps them in place perfectly. I didn't want to glue them for fear of covering up any part of the bulb and reducing the light output.

Working my way along to the thermal cannon arm, I built the upper part as normal, sans the piston that goes into the shoulder. This allows you to use that hole for lights and wires to pass through on the way to the board.

Not wanting to make it complicated, I opted to bring the wires down through the second part of the arm. I drilled and cut open a few parts, allowing me to place the wires without getting in the way of any moving parts.


I then tested the fit, as always, to make sure it actually works. Here is what it looks like:


Down to the gun shroud go the lights. As you can see from this picture, the 3mm LEDs were small, too small for me. I was unsure of how to proceed (see: not wanting to glue lights, above) as I was building, and only had the 3mm at the time. I accidentally ordered the right color but the wrong size yellow lights to go in the gun, but gave them a try anyway. As it turns out, the 5mm lights fill the tube perfectly, and the lip holds the light in place (given enough tension) without any need for glue. Huzzah!


Inside the shroud itself, I sprayed white so as to reflect the most light around and out the hole (all drilled out as well), and painted the holes themselves orange because it felt right, mainly. You don't even see the orange when it's lit up, so it's up to the builder's preference, really.


Here is how the entire setup looks, slapped together:


One thing of note: do any spray painting for lit parts BEFORE you build it and install lights. I sprayed my bits black for a primer and then Leadbelcher as the base metal (see the full painting guide, here), all before gluing them together. This ensures that paint does not get on the lights, which is quite important for brightness!


Altogether, this was a fun build and conversion. The LEDs from PoweredPlay made it a breeze to light up, and with a little thought it came together with minimal effort and maximum results.

I hope this article has given you some ideas for lighting up your own knight titan model, and hope to see you back again!