I painted something!!!
It's been too long, dear readers, but I finally have some new content for you to feast your eyes on.
This week (as in, it took two days start to finish, because I'm in the process of moving and needed to get it DONE), I painted up Forgeworld's Carmine Dragon as a commission piece.
 |
| Rawr. |
He wanted it to go with his Wood Elves army, mainly as a Green or Forest Dragon scheme, so that is what I strove to achieve. He wanted a more whiteish highlight on greens, so I took to Sybarite Green and Gauss Blaster Green to make that happen.
I otherwise stuck to some classic techniques that I personally enjoy using, especially for the horns and teeth, while trying out a couple other new ones.
 |
| Don't touch my egg. |
I had fun with it for sure, as I'd never painted a dragon before, especially a big one like this.
 |
| Spikes for daaaaaays. |
 |
| Oh hai, I see you. |
 |
| From above. |
 |
| From slightly more above. |
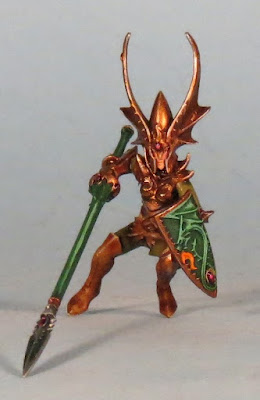
Since it was to be an epic dragon though, he wanted it to have a rider. And here he is!
 |
| I don't always take good pictures. |
 |
| You wish you could dragon surf like this guy. |
 |
| Elves care not for physics. |
 |
| Sweet elvish bootay. |
 |
| He's stabbing this caption. |
 |
| "Hi-ho, Silv-I mean Green, away!" |
Here are my stages for painting over a black primer, for anyone curious enough to give it a go:
Dragon
Scales layers:
- Caliban Green base
- Warpstone Green layer 1 (overbrush)
- Sybarite Green layer 2 (drybrush)
- Gauss Flayer Green layer 3 (drybrush)
- Waywatcher Green (wash)
- Sybarite Green layer 4 (drybrush)
- Gauss Blaster Green layer 5 (drybrush)
- 1:1 Gauss Blaster Green : White Scar White layer 6 (drybrush)
Belly layers:
- Caliban Green base
- Loren Forest layer 1 (overbrush)
- Straken Green layer 2 (drybrush)
- Nurgling Green layer 3 (drybrush)
- Ushabti Bone layer 4 (drybrush)
- Screaming Skull layer 5 (drybrush)
- Waywatcher Green (wash)
- Caliban Green base
- Loren Forest layer 1 (overbrush)
- Straken Green layer 2 (drybrush)
- Nurgling Green layer 3 (drybrush)
- Ushabti Bone layer 4 (drybrush)
- Screaming Skull layer 5 (drybrush)
- Waywatcher Green (wash)
Bone layers:
- Rhinox Hide base
- Bestial Brown layer 1 (layered)
- Snakebite Leather layer 2 (layered, slightly lined)
- Bubonic Brown layer 3 (layered, lined)
- Ushabti Bone layer 4 (layered, more clear lined)
- White Scars White layer 5 (layered, distinct lined)
- Rhinox Hide base
- Bestial Brown layer 1 (layered)
- Snakebite Leather layer 2 (layered, slightly lined)
- Bubonic Brown layer 3 (layered, lined)
- Ushabti Bone layer 4 (layered, more clear lined)
- White Scars White layer 5 (layered, distinct lined)
Mouth/Gemstone layers:
- Khorne Red base
- Emperor's Children layer 1 (drybrushed/spotted)
- Thinned Purple Ink wash
- Emperor's Children layer 2 (same as ^)
- White Scars White layer 3 (spot highlight)
- 'Ard Coat gloss
- Khorne Red base
- Emperor's Children layer 1 (drybrushed/spotted)
- Thinned Purple Ink wash
- Emperor's Children layer 2 (same as ^)
- White Scars White layer 3 (spot highlight)
- 'Ard Coat gloss
Eyes:
- Yriel Yellow base
- Red Ink glaze
- Yriel Yellow touch up
- Black (pupil)
Elf
Gold Armor:
- Balthasar Gold base
- Reikland Fleshshade wash
- Gehenna's Gold layer 1 (layered/drybrushed, depending on location)
- Mithril Silver layer 2 (same as ^)
- Reikland Fleshshade wash
- Gehenna's Gold layer 1 (layered/drybrushed, depending on location)
- Mithril Silver layer 2 (same as ^)
Skin:
- Dwarf Flesh base
- Reikland Fleshshade wash
- Dwarf Flesh layer 1 (layered)
- Elf Flesh layer 2 (layered)
- Dwarf Flesh base
- Reikland Fleshshade wash
- Dwarf Flesh layer 1 (layered)
- Elf Flesh layer 2 (layered)
Eyes:
- Pallid Wych Flesh base
- Black (pupil)
Boots/Belt/Packs:
- Zandri Dust base
- Seraphim Sepia wash 1
- Reikland Fleshshade wash 2
- Ushabti Bone layer 1 (layered)
- Zandri Dust base
- Seraphim Sepia wash 1
- Reikland Fleshshade wash 2
- Ushabti Bone layer 1 (layered)
Green Cloth:
- Straken Green base
- Athonian Camoshade wash
Speartip:
- Boltgun Metal base
- Coelia Greenshade wash
- Mithril Silver highlight
Base
Tree:
- Raw Umber base
- Celestra Grey layer 1 (drybrush)
- Ushabti Bone layer 2 (drybrush, inner rings)
Moss:
- Castellan Green base
- Nurgling Green layer 1 (drybrush)
Ground:
- Rhinox Hide base
- Mournfang Brown layer 1 (overbrush)
Rocks (as per Ground, then):
- Celestra Grey layer 2 (overbrush)
- Longbeard Grey layer 3 (drybrush)
Thanks for reading, I'll see you again soon enough!

No comments:
Post a Comment